A REASON TO RUN

Saturday, December 24, 2011

A Birthday Song for Jesus


I love it when God sings to me. I even like it when I can sing to the enemy. But today I'd like to sing to God. When I was walking yesterday this song popped into my mind, just out of nowhere, I hadn't thought of it in years.. It was one of my favorites when I was a young romantic idealist. Today, I want to offer this song to Jesus, as a Christmas gift. This song that originally bore my name, today is called "Song for Jesus"


Merry Christmas Everyone.

Thank you Jesus for coming to me.


Friday, December 23, 2011

Aunt Doris' Famous Doughnuts


Photobucket


When I was in high school my mom and dad wrote a wonderful family cookbook. I wrote about it here and here when I first began blogging if you want to take a peek.

Many of the recipes in this book are ones that my mom got from other missionaries in Chile. This recipe is from my aunt Doris Dyches. And if you ever try them you will know why they are so famous.


Aunt Doris' Famous Doughnuts

1 cup boiling water
¼ cup sugar
1 ½  tsp. salt
3 Tbsp. shortening
4 cups flour
1 ¼ tsp. yeast
¼ cup water
1 tsp. sugar
1 egg


Glaze:

1 box powdered sugar (1 lb.)
½ Cup boiling water (I use milk, no need to boil)
1tsp. vanilla

Mix first 4 ingredients. Dissolve yeast in the  ¼ Cup of water and tsp. of sugar, set aside.
You are supposed to let the water cool down to lukewarm. But what I do is I add 2 cups of flour, mix it in. In a small bowl beat the egg slightly and add it to the water/flour mix. By then the mix is cool enough to safely add the yeast. Stir it in and then add the other 2 cups of flour. Mix well and put it in a large bowl to raise overnight.
In the morning it should be about double. Take the dough and turn on slightly floured surface and knead till glossy (and stretchy). Roll to about ½ inch thickness. If you have a donut cutter great, if not,do what I do. Cut out a circle with a glass, then pinch a hole in the middle and stretch out to look like a donut. Make sure your hole is bigger than you think it should be because it will rise a little and then expand when you fry it.
As you can see here, I like to grease aluminum foil to lay mine on to rise. Let rise for 1 hour. Don't worry if they don't rise much, an hour is enough and a soon as they hit the oil they will expand.

 Photobucket

I like using a fry daddy. They only take a couple of minutes on each side, so be attentive. have your glaze ready. And yes, they are frying, in oil. DO NOT JUDGE ME! They are donuts, you FRY them! OK?


Photobucket 

As soon as you take them out of the oil, plop then straight into the glaze.

Photobucket 

Swirl around, drip, drip.


Photobucket 

And eat, eat.

When you make them make sure you eat the first one because the rest will disappear before you can ask if they were good!

Photobucket

There is only one rule. Don't eat these the same week you have The Best Fettuccine Alfredo Ever. OH CRAP! We are having Lobster and Shrimp Fettuccine Alfredo on Christmas eve. Well, it's Christmas, I guess it will be ok. I mean, I only make these like 2-3 times a year....

Oh wait, there is another rule. Eat them while you still have your pj's on, you know... the "stretchy" ones!


MERRY CHRISTMAS!

Tuesday, December 20, 2011

Chocolate Peppermint Cookies


Photobucket


These here folks are my personal favorite Christmas cookie ever. Maybe even my favorite cookie ever.
I got the recipe originally from Martha Stewart.

Here is the sad part of the story. For some strange reason, although I love peppermint, peppermint does not like me. I actually get the worst headache. I don't want to call it a migraine, because I have too much respect for those unfortunate that get those. But if you could take one step down, and imagine the worst headache, that is what peppermint does to me. So sad. Poor me. :(

But once a year I make these, and I usually will only have a couple before I go to bed in hopes that I can sleep straight through the pain. Or if I have them earlier, I wash them down with some ibuprofen. I know, life is sad, but I just can't imagine a December without them.

Well, here it goes.


Chocolate-Peppermint Cookies

1 & 1/2 Cups all-purpose flour
1/2 Cup cocoa powder
1/2 tsp baking soda
1/2 tsp coarse salt
4 ounces milk chocolate, chopped (I use milk chocolate chips)
1 stick unsalted butter
1 & 1/2 Cups sugar
1 tsp. pure vanilla extract
1/4 tsp. pure peppermint extract
3 large eggs
45 peppermint candies, coarsely crushed


Begin unwrapping the candies and have one for yourself of course, since I can't.

Photobucket

In a bowl mix the flour, cocoa, soda and salt, set aside.

Melt butter and chocolate in a heatproof mixer bowl set over a pan of simmering water.
After it's melted attach bowl to mixer fitted with the paddle attachment. Add sugar and extracts.


Photobucket 

yummy I wish you could smell that right now.


Add eggs, one at a time as you mix at medium-low speed.
Slow down speed and add flour mixture.

Take 15 of the candies and crush them. I put them in a plastic bag and with the side of my mallet I hit each piece only once.


Photobucket

Take those and add to the mix.


Photobucket

Refrigerate dough in fridge at least 30 minutes. This is when I clean up my mess and preheat oven to
325 degrees.


Place cookies on your cookie sheet or stone lined with parchment paper (a girl's best friend!).
I use the small Pampered Chef scoop. It makes the shaping clean, easy and the perfect size cookie.

Flatten cookie a bit with your fingers and add coarsely crushed peppermints, remember, you have 30 more to play around with.


Photobucket


Photobucket

Here is the end result.

Photobucket 

Here is the tricky thing about these cookies.
They take about 13 minutes to bake. I bake them 15 minutes, because they take longer on a stone. So if you have a stone, bake longer. BUT, for some reason they really like to stick to the parchment paper.
The best solution to this problem would be to overcook them, but you may not want to do that. Here is what I do. Once I take them out of the oven I leave them to rest on the stone 3-4 minutes. Then I remove the whole batch by grabbing two corners of the parchment paper and place it on a cooling rack. Wait long enough for them to cool before trying to remove from the parchment paper. Place the paper with cookies still on them on a flat surface and use the back side of the spatula to scrape off. That helps. Anything that sticks to the parchment paper is fair game, like licking the bowl!
I hope that made sence. It is worth the trouble. I think the reason that I like these cookies so much is well, first of all, chocolate and peppermint is like the perfect marriage. Also, the fact that they are made with candy makes them chewey. Oh my word, just too good!
I hope you make them and that you love them as much as I do. You probably won't have any left for Santa.

Photobucket

Saturday, December 17, 2011

Welcome to my Christmas


Come on in and have some Fudge.


Photobucket


Photobucket

Turn left:


Photobucket

Since I'll be hosting Christmas dinner this year, and I don't have any furniture for the formal living room, and I love to have people over anyway, I decided to turn the living room into a second temporary dinning room.


Photobucket

Come on into our family room and make yourself at home.

Photobucket


Photobucket

While you are here, you must check out my most special Christmas decore. This here is a chilean Christmas Manger Scene. I have had this for about 25 years. My mom and dad gave it to me when I left Chile. Through the years I have added pieces to the small collection I began with. My dad's favorite is the hanging angel. I love it too, but...

Photobucket

......

Photobucket

...if you take a peek  behind Joseph you will see my special friend the black sheep. Isn't he precious? Say yes, because he is me, and perhaps he is you too. At times don't we all feel like the proverbial "black sheep", the one who feels like perhaps we just don't belong here, there, anywhere?  ... yet here, at the feet of Jesus I do belong and I try to get, yes, as close as I can get to my Savior. He wants you there too, come join me as I worship the King of Kings and the Lord of Lords, Emanuel.

Photobucket

Do you see how wounded Joseph is? Poor fella'. He was on his way to Bethlehem and got a little distracted, took a tumble and fell off a cliff and landed on the hardwood floor rocks. Jesus wasn't born yet so he wasn't any help. All the kings horses and all the kings men couldn't put poor Joseph together again either. So my superhero, Mike, came to the rescue and got him all patched up. Good thing he survived and will now able to flee to Egypt when the time comes. Poor Mary, not sure she could make it without him. If nobody tells her, I think I'm going to have to sweet talk one of my friends in Chile into replacing my Joseph for me. That way, next year, maybe the journey won't be so hard.


Thursday, December 15, 2011

My First Fudge


Photobucket


Although I am 42 years old and I love to cook, believe it or not, I have never made fudge before! I'm asking myself right now how on earth have I made it without this fudge in my life? I think that one of the reasons is because I never thought of myself as a fudge lover, I like fudge, but I never choose fudge, if you know what I mean. But let me tell ya', this fudge is worth choosing. Also I always figured that it was just too much of a hassle. When I was a girl I remember watching my dad make candy, peanut brittle, and caramel popcorn, oh, they were to die for, but looked so hard to make that I never really thought of learning how to do them myself. But this recipe is actually real simple and seemingly fool proof.

So, I'm sort of on this quest to make 12 delicious masterpieces for the 12 days of Christmas. I was a little ahead of myself and have made several already and will will be posting some of them later on and out of order.

Here is what I have made so far:

Cran-Pistachio Cookies, very, very good!

Red Velvet Cake Balls, to die for!

Chocolate Covered Pretzel Sticks, just simple loveness. I make these every year and every holiday, just change the color of the sprinkles. These are Elijah's favorite to make and eat.
Here are some that we made a couple of years ago for Valentines Day.


Photobucket 


But today's masterpiece:
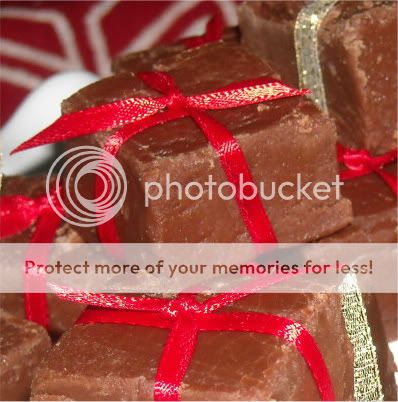
Grannie's Fudge
 TA-DA!

Photobucket

Photobucket 

Now isn't that prertty! I fancied them up a little so Mike could take them to work and impress everyone at the office. A little dangerous first impresion to give though. Don't these scream fabulous, gorgeous, totally put together woman? Mercy, I'll never live up to my fudge. Good thing his office is an hour away.

Anyway...
No need for me to tell you how to make these. My Friend Edie from Life in Grace has a marvelous post that you can follow. She has a fabulous Blog. Go ahead and check her out. She is an amazing cook. You can try any of her recipes with total confidence. My personal favorites are Rocky Top Chili, which I'm making today, yay!, and Chipotle Pumpkin Barley Soup (only , I make mine with rice), a must for the first cold days in the fall.

For today go, go try Grannie's Fudge for yourself. You must take her advice and wear the stretchy pants, I'm so glad I wore mine today.


Tuesday, December 13, 2011

THE best Fettuccine Alfredo you have EVER had


If you are on a diet, skip this post.

Warning: this dish is loaded with fat and carbs of the worst kind on both accounts.
But if you want to die of a heart attack and go to Italian heaven, please, follow me this way.

THE Best Fettuccine Alfredo You Have EVER Had

First you need to chop up 1/3 cup of green onions really fine. If you are a fan of the food chopper, I strongly advise against it, the thin membranes of the onion make it virtually impossible to chop the green onions nicely, like you want them. Also chop 1/3 cup of parsley.

In a pan put a stick of butter, REAL butter please, preferably unsalted, and melt. Add onions and parsley and cook on med. heat. 


Photobucket


As soon as the butter is melted add 1/2 tsp of garlic powder, 1/8 tsp. cayenne pepper (or less if you don't want too much spice), 1/4 tsp. white pepper and the same of black pepper. (I am not a fan of black pepper so I just add the token  few twists of the mill). Add a little bit of kosher salt. The Parmesan cheese will salt it lots, so you don't want it to be too salty. You can always add more later.

 Let that all bubble up and cook for a good 5 minutes or so, it's OK if it begins to brown some, just be sure your heat isn't too high and you actually burn it.


Photobucket


Then poor in your cream.


Photobucket


Bring to a boil, turn down, and reduce just minute or two, add the Parmesan cheese. (the cheese will do most of the thickening for you).

Photobucket

OOOOPS!!! I just got totally distracted by what was going on right beside me as I was stirring.
Sorry, back to the pasta.


After you reduce you can add shrimp if you want it with shrimp (I usually fix it this way). Make sure your shrimp is ready, all shells removed, devained, clean and it's even better if you lay them on a paper towel to soak up moisture. NEVER add frozen shrimp or even almost defrosted shrimp, it will curdle your cream.

It will take the shrimp only a few minutes to cook, don't overcook or they will be tough.

If you are going to add chicken, then wait till you sauce is done, the longer you cook it the thicker it will get, so just cook it till it has the consistency you want. I cook my chicken on a skillet. I simply flatten them out, sprinkle with course salt and a twist or two of pepper. I have my skillet nice and hot with EVOO and begin with the salted side down. After it is seared I turn the temp down and cook another 5 minutes or so. Then turn over and cook till done. Cut slices of chicken and lay on the Fettuccine Alfredo.

Photobucket

I totally know what you are thinking. "That isn't Fettuccine!"
Well, this is actually what you do when you don't realize you are out of fettuccine until you water is boiling, you are hungry, and you don't want to run to the store AGAIN.

Take it from me though, go to the store and get the fettuccine, it's lots better.

Photobucket 


THE Best Fettuccine Alfredo You Have EVER Had


1 stick unsalted butter
1/3 Cup Green Onion
1/3 Cup Fresh Parsley
1/2 tsp. garlic powder
1/4-1/2 tsp. white pepper
1/8 tsp. cayenne
salt and black pepper to taste
1 Pint Whipping Cream
1/2-2/3 Cup Parmesan Cheese

Optional: add 1 Lb. fresh shrimp peeled and devained
or cooked chicken

Not optional: A resolve to enjoy and walk away with a clear conscious.

HA!

Photobucket

There it is again. Almost gone.


Thursday, December 1, 2011

My Christmas Wreath

Photobucket
I rarely feel pride in what I do. Somehow I seem to always find every fault imaginable even if I am just imagining it. I hate bragging and that may, to some extent, be one of the reasons that I find it so hard to stick to blogging. It seems to always come down to just one word, FEAR. I know, it is something I desperately need to work on, and some day I may come up with enough nerve to actually write about it, because I believe that at some level it can also be called PRIDE. Deep....

Well, today I will finally let you see a project that I made several weeks ago. I mentioned it to you when I made my Fall wreath, and I have been dieing to show it to you. It may not be perfect, it may have lots of flaws, but I am in LOVE with it. And yes, I am PROUD.

I originally saw this wreath on Pintrest, which took me to it's souse at ETSY. I searched and searched for a tutorial since I wasn't willing to pay that much for it, but all of the tutorials I found were lame and none directed me to the final product I was looking for. I had almost everything I needed for the project, so I bravely did something I never do: wing it.

I wish I could give you a tutorial, but honestly, I winged it, from beginning to end.
First I wrapped a foam wreath with some scrap burlap (hopefully you will see what I did with the rest of it soon). Then I cut long strips. My strips were 6 and 1/2 inches wide and I just twisted and turned each segment till I liked how it looked, then I grabbed my hot glue gun and quickly squirted a huge glob on to make it stay in place. I burned my fingers A LOT that day. But, it was so worth it.


Photobucket


Photobucket


Photobucket

And what do you know? Some how I ended up with this beauty!


Photobucket 


Photobucket


Photobucket


GORGEOUS!!!!

Tuesday, November 8, 2011

Welcome To My Dining Room

I must tell you that this is probably the last room you will see for a while. The rest of the house is not "put together" and it won't be till more funds come in. But I knew I owed you this one.

Let me remind you of what this room looked like when we moved in.

Photobucket


This is what it looks like today.


Photobucket

The formal Living Room is actually somewhat empty. I only have a bookshelf and, you may catch it on the right bottom corner of the photo, another table. This table is what I used to have in my craft room. But because I love having Mike's family over and we need the space when they do, and it is a very heavy table, and it's a pain to move it back and forth up and down the stairs, I decided to leave it there for now.

My dream for this room is to refinish all of the non matching chairs so that they are all the same color and have the same upholster fabric (there are 4 more chairs at the other table). The only problem with that is that then they won't look so good with the table and the china cabinet and buffet. A lot of work that to be honest just isn't my thing. (should of thought of that when I kept buying chairs here and there and everywhere!)

I also want to paint. The open parts of the downstairs are all the same color (it's a lot greener than what the pictures show). The kitchen, bathroom and office ar different. Of course I want to change it all. I like it OK to live with for now, but I am itching to give it a new look. The kitchen...I won't even go there, will be the first to get a facelift. The rest will follow...someday....


Posted by Picasa